Create Statements
Operation > Create Statements or 
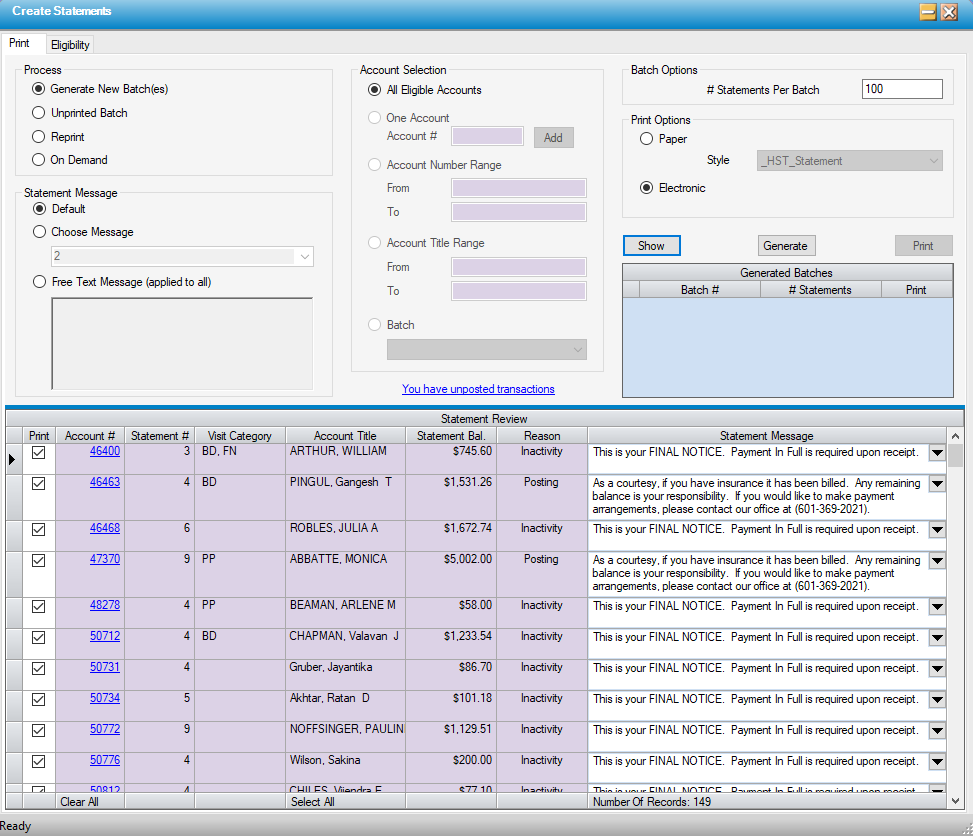
Process
Generate New Batch(es)
- When opened, this form will default to Generate New Batch(es), Default Statement Message, All Eligible Accounts, and - if center is set up for Electronic transmission of statements in the System Interface tab of Administration > Configuration > Center Configuration - the Electronic print option.
-
The
 hyperlink will appear if there are payments and/or charges that have been entered, but not yet posted. Selecting the hyperlink will invoke the Transaction Posting form so that these transactions can be viewed and/or posted prior to generating statements. (A payment that has been entered, but not posted, will not appear on the statement. For accurate statements, it is recommended that all transactions have been posted prior to generating statements.)
 - Select
 to view all statements that are ready to Generate in the Statement Review grid.
 - The Print column will default with the box in the Print column checked for all Statements created. Individual Statements can be deselected by unchecking the box or the Clear All/Select All functions can be utilized and individual Statements selected by checking the boxes.
- Select
 to generate a batch for the selected Statements.
 - Select the Print function in the Generated Batches grid to transmit, download, or print the Statement batch generated.

NOTE: Whether statement batches transmit, download, or print will depend upon the settings selected in the System Interface tab of Center Configuration.
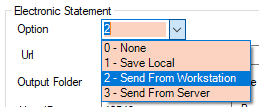
- 0 - None: Paper Style will be the only option available under Print Options. When Print is selected, Statements will be generated in PDF format which can be viewed prior to printing. (Default Paper Style can be selected in Administration > Configuration >Statement Option.)
- 1 - Save Local: When Print is selected, system will create a file to be saved to the desktop and uploaded to a clearinghouse.
- 2 - Send From Workstation or 3 - Send From Server: When Print is selected, batch will transmit directly to clearinghouse.
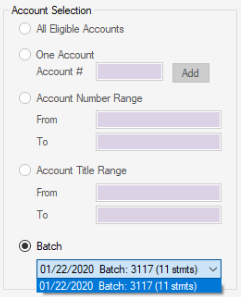
Unprinted Batch
- Select the Unprinted Batch radio dial to print batches that may have been generated, but not printed, downloaded, or transmitted.
- When this radio dial is selected, the Account Selection will default to Batch, and any batches that were generated but not processed will be available for selection from the drop down.
- Follow the remaining steps outlined above to complete the processing of the batch(es) selected.
Reprint
- Select the Reprint radio dial to reprint an individual statement, an Account Number Range, an Account Title Range, or a previously processed batch.
- Follow the remaining steps outlined above to complete the processing of the batch(es) selected.
On Demand
- When the On Demand radio dial is selected, the Statement Message will default to Choose Message. This is a required field. A standard message can be selected from the drop down, or the radio dial for Free Text Message can be selected and a custom message typed.
- When the On Demand radio dial is selected, the Account Selection will default to One Account. Enter the Account number and select Add, or use the Account # hyperlink to search by Account Title (name) or Account Number.
- Select the
 function to add to the Statement Review grid. (Multiple On Demand statements can be generated by repeating these last 2 steps.)
 - Follow the remaining steps outlined above to complete the processing of the batch(es) selected.
|
NOTE: On Demand statements disregard all statement triggers and suppressions. When an On Demand statement is generated, it will reflect all transactions for the account(s) selected. |
Statement Message
- The Default radio dial will be the default selection for all Processes except On Demand. This option will print the standard Statement Message based upon the triggers that created each statement.
- The Choose Message radio dial allows users to choose a standard Statement Message from the drop down.
- Free Text Message (applied to all) opens the free text box below to enter a custom Statement Message. The message typed here will be applied to all Statements for which the check box in the Print column of the Statement Review grid has been checked.
Account Selection
- All Eligible Accounts will be the default radio dial when Generate New Batch(es) is selected and will create Statements for all accounts that are due for a statement based upon the Statement Triggers set in Statement Option.
- The One Account radio dial will be open for selection if Reprint or On Demand are selected.
- Enter the Account number and select Add, or use the Account # hyperlink to search by Account Title (name) or Account Number.
- Select the function to add to the Statement Review grid. (Multiple On Demand statements can be generated by repeating these last 2 steps.)
- The Account Number Range radio dial is active only as a Reprint option.
- Enter a From and To account number or use the From and To hyperlinks to search by Account Title (name) or Account Number.
- The Account Title Range radio dial is active only as a Reprint option
- Enter a From and To account title or use the From and To hyperlinks to search by Account Title (name) or Account Number.
- The Batch radio dial will be open for selection if Unprinted Batch or Reprint are selected. When this radio dial is chosen, available batches can be selected from the drop down.
Batch Options
- # of Statements Per Batch displays the Statements Per Batch entered in Administration > Configuration > Statement Option. If this number is exceeded, more than one batch will be created. In the example below, # of Statements Per Batch was set to 100, but 366 statements were generated, so they were broken down into 4 batches.
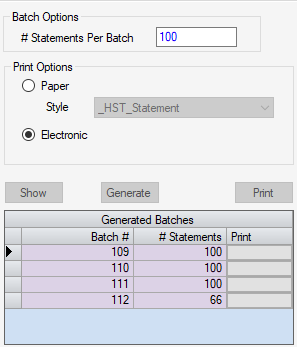
Print Options
- Paper Style will default to the Default Statement Form (if selected) in Statement Options. If no default was entered or a different style is desired, select the desired option from the drop down.
- The Electronic radio dial will be visible and the default selection for centers that are set up for Electronic Statement Options on the System Interface tab of Administration > Configuration > Center Configuration. Only two electronic formats are available: standard and CPT format. Contact HST Support to establish this format.
NOTE: In addition to contacting HST to set up the new electronic statement format, be sure to also make sure the clearinghouse is aware that the center will be utilizing the new format.
Generated Batches grid
- The Generated Batches grid will display the Batch #, the # of Statements in the Batch, and a Print function when New Batches are generated.
- For Unprinted Batch, Reprint, or On Demand Statements select the
 function found above the grid.
Statement Review grid
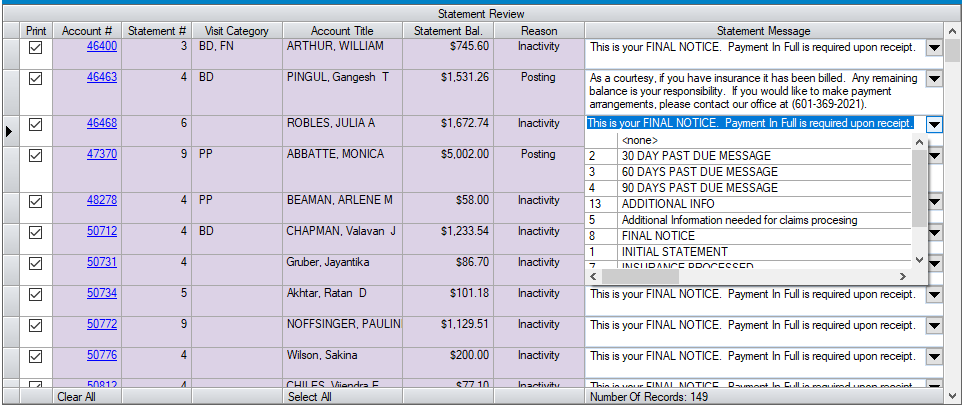
- Any column on the grid can be sorted by selecting the column header, and the columns can be rearranged by dragging the header to a new position.
- The Account # is a hyperlink. To review any Patient Account prior to deciding whether to proceed with Statement generation, simply click on this hyperlink.
- The Statement # will indicate the total number of statements that have been generated for the account prior to generating the current statement. (Note: This is a complete history, not just for the visit(s) currently being billed.)
- Visit Category column will reflect any Visit Categories that have been assigned in the Patient Account to visits on the current statement.
- The Account Title is the patient name.
- The Statement Bal. reflects the total amount being billed to the patient on the current statement.
- The Reason column reflects the reason that the current statement was created. Posting would refer to triggers set in Statement Options where either Insurance Payment or Self-Pay Payment will trigger a statement. Inactivity would indicate that none of the triggers have been met within the 28 day patient statement cycle. (In other words, the patient is simply due for another statement.)
- The Statement Message will default to the standard Statement Message based upon the trigger that created the statement. A different Statement Message can be selected from the drop down or a custom message can be typed in this field.